Jenkins and Kubernetes - Secret Agents in the Clouds

| This is a guest post by DevOps World | Jenkins World speaker Mandy Hubbard. |
At long last, the way we build and deploy software is finally changing and significantly so. The days of the persnickety, prima donna build machine where monolithic applications were built, tested, and deployed are numbered. And that is a "Good Thing (tm)" - a consequence of how we will meet the transformation goals of our businesses. Modern applications consist of distributed services, often with multiple microservices that are developed and deployed independent of other services. However, the only way to build these services with their own dependencies and schedules is to bake in continuous integration and delivery from the beginning. And as usual, your Jenkins platform is your friend.
But let’s take a moment and think about that in the context of microservices, especially if you’ve only used Jenkins for monolithic applications. You’ll be creating a greater number of individual Jenkins jobs that each run multiple times a day. This is a significant process change, and it’s important to acknowledge this and change our approach to managing Jenkins to accommodate these changes. It’s well within Jenkins’ capabilities, but you will need to think a little differently, and invest to close those last-mile deployment gaps.
Evolution of my Jenkins Environment
One of the biggest challenges I’ve faced as a DevOps practitioner is a long and evolving set of options to manage my Jenkins agent infrastructure. With only a few large jobs you don’t really need to worry too much about your agents. But when you’re orchestrating the CI/CD pipelines for dozens or even hundreds of services, optimizing efficiency and minimizing cost becomes important. And that journey has allowed me to consider and test many different Jenkins build agent architectures over the years. This journey may be familiar to you as well.
These are the types of Jenkins environments I’ve run over the years.
-
Execute all the builds on the controller. Concentrate all the moving parts on one instance. (I call this Hello Jenkins)
-
Create a Jenkins EC2 agent with all the required tools for building every service, and then clone it if I need to “scale” Jenkins. (I call this the Monster Agent.)
-
Create an individual Jenkins EC2 agent for each service I need to build. (I call this the Snowflake Agent.)
-
Run build steps in containers. For example, launching agents in containers using the Docker Plugin or using multi-stage Dockerfiles to encapsulate all the logic for building, testing and packaging an application. They are both good first steps in container abstraction and allow you to easily copy artifacts from one container to another. Of course, access to a Docker engine is required for either approach, and I’ve managed my Docker host(s) for running Jenkins agents several different ways:
-
Run the Docker engine inside my Jenkins controller container - Docker in Docker (DinD)
-
Mount the Docker socket of the host on which my Jenkins controller container runs, allowing agents to run as sibling or sidecar containers - Docker outside of Docker (DooD)
-
Configure a single external EC2 Docker host for the Jenkins controller to use for launching builds in containers
-
Dynamically launch agents using the EC2 plugin with an AMI that contains the Docker Engine and then run all the steps in a multi-stage Dockerfile
-
All these approaches were attempts to get out of the business of curating and managing Jenkins agents and infrastructure, each with their own benefits and drawbacks. But recently I begin working in a new Jenkins environment - Jenkins on Kubernetes.
Once you’ve come to view Jenkins, build agents and jobs as containerized services, migrating platforms becomes much more straightforward. And total disclaimer here - I had never used Kubernetes in my life, not even for side projects - when I set out to do this. That said, it was surprisingly simple to create a Kubernetes cluster in Google Cloud Platform’s (GCP) GKE, launch a Jenkins controller using a Helm chart and begin running build steps in Jenkins agents running in containers on my new Kubernetes cluster.
Launch agents in Kubernetes from your pipeline scripts
The focus of this post and my Jenkins World talk for 2018, is to show you how to configure Jenkins to launch agents in Kubernetes from your pipeline scripts. My examples assume you are launching your agents in the same Kubernetes cluster where your Jenkins controller is running, but there are other options. You’ll begin by installing the Kubernetes plugin. As a bonus, when I installed Jenkins using the latest stable chart in the default Helm repository, the Kubernetes plugin was automatically installed for me.
Once you get the Jenkins controller running on your Kubernetes cluster, there are only a few configuration steps required and then you can begin launching ephemeral build agents on Kubernetes.
Configure the Jenkins controller
You’ll first need to create a credentials set for the Jenkins controller to access the Kubernetes cluster. To do this, perform the following steps:
-
In the Jenkins UI, click the Credentials link in the left-hand navigation pane
-
Click the arrow next to (global) in the Stores scoped to Jenkins table (you have to hover next to the link to see the arrow)
-
Click Add Credentials
-
Under Kind, specify Kubernetes Service Account
-
Leave the scope set to Global
-
Click OK.
That’s it! This configuration allows the Jenkins controller to use a Kubernetes service account to access the Kubernetes API.
Create a Cloud Configuration on the Jenkins controller
The next step is to create a cloud configuration for your K8s cluster. (When I use K8s instead of Kubernetes it’s because it is quicker to type, not just for coolness.)
-
In the Jenkins UI, go to Manage Jenkins → Configure System
-
Scroll down until you see Cloud settings and click the Add a new cloud box and select kubernetes
-
The following parameters must be set:
-
Name: <your choice> - This defaults to
kubernetes -
Kubernetes URL:
https://kubernetes.default- This was automatically configured from the service account. -
Kubernetes Namespace:
default- Unless you are running your controller in another namespace -
Credentials: Select the Kubernetes Service Account credentials you created in the previous step
-
Jenkins URL:
http://<your_jenkins_hostname>:8080 -
Jenkins tunnel:
<your_jenkins_hostname>:5555- This is the port that is used to communicate with an agent
-
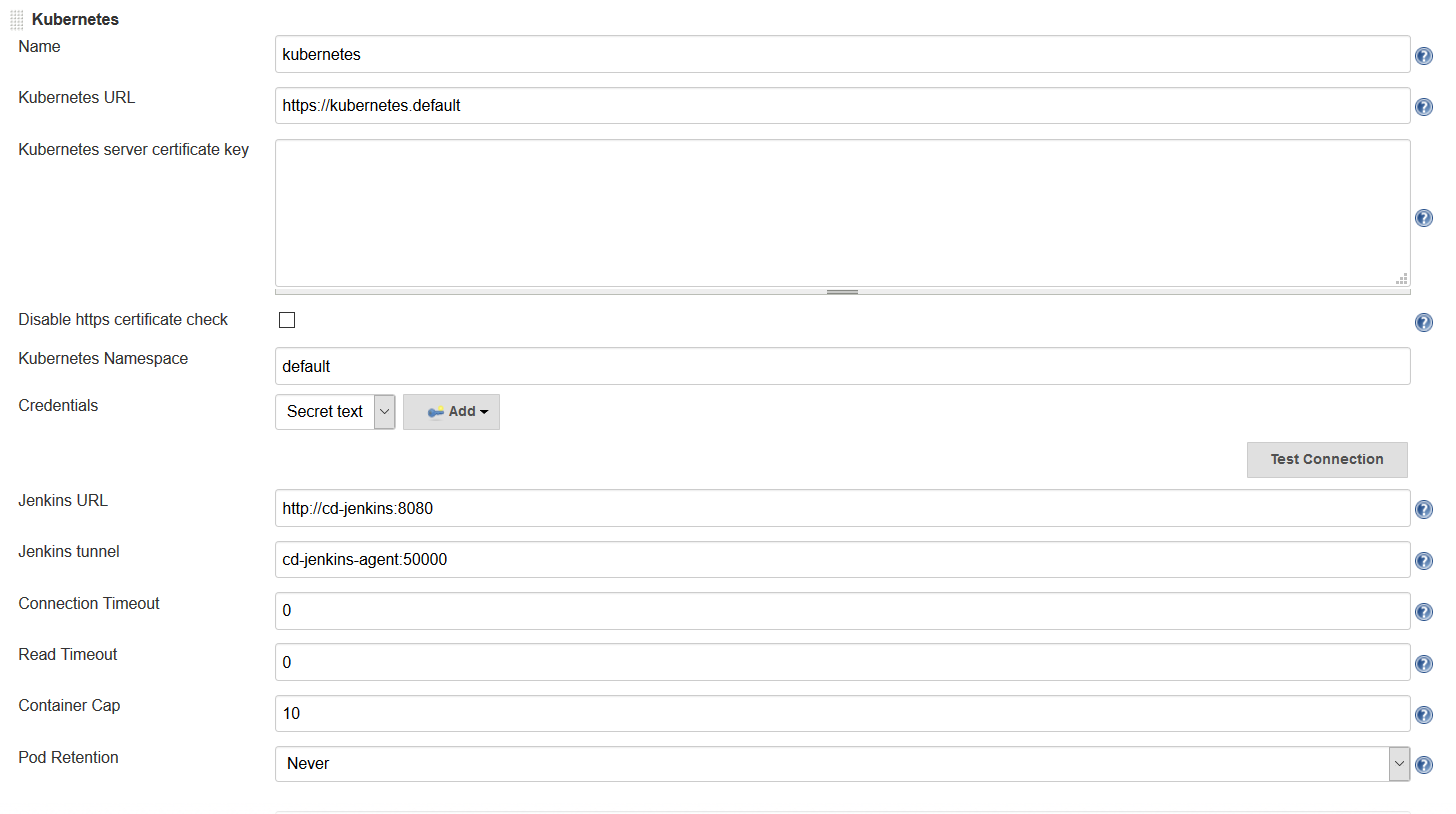
These were the only parameters I had to set to launch an agent in my K8s cluster. You can certainly modify other parameters to tweak your environment.
Now that you’ve configured your Jenkins controller so that it can access your K8s cluster, it’s time to define some pods. A pod is the basic building block of Kubernetes and consists of one or more containers with shared network and storage. Each Jenkins agent is launched as a Kubernetes pod. It will always contain the default JNLP container that runs the Jenkins agent jar and any other containers you specify in the pod definition. There are at least two ways to configure pod templates – in the Jenkins UI and in your pipeline script.
Configure a Pod Template in the Jenkins UI
-
In the Jenkins UI, go to Manage Jenkins → Configure Systems
-
Scroll down to the cloud settings you configured in the previous step
-
Click the Add Pod Template button and select Kubernetes Pod Template
-
Enter values for the following parameters:
-
Name:
<your choice> -
Namespace:
default- unless you configured a different namespace in the previous step -
Labels:
<your choice>- this will be used to identify the agent pod from your Jenkinsfiles -
Usage: Select "Use this node as much as possible" if you would like for this pod to be your default node when no node is specified. Select "Only build jobs with label matching expressions matching this node" to use this pod only when its label is specified in the pipeline script
-
The name of the pod template to inherit from - you can leave this blank. It will be useful once you gain experience with this configuration, but don’t worry about it for now.
-
Containers: The containers you want to launch inside this pod. This is described in detail below.
-
EnvVars: The environment variables you would like to inject into your pod at runtime. This is described in detail below.
-
Volumes: Any volumes you want to mount inside your pod. This is described further below.
-
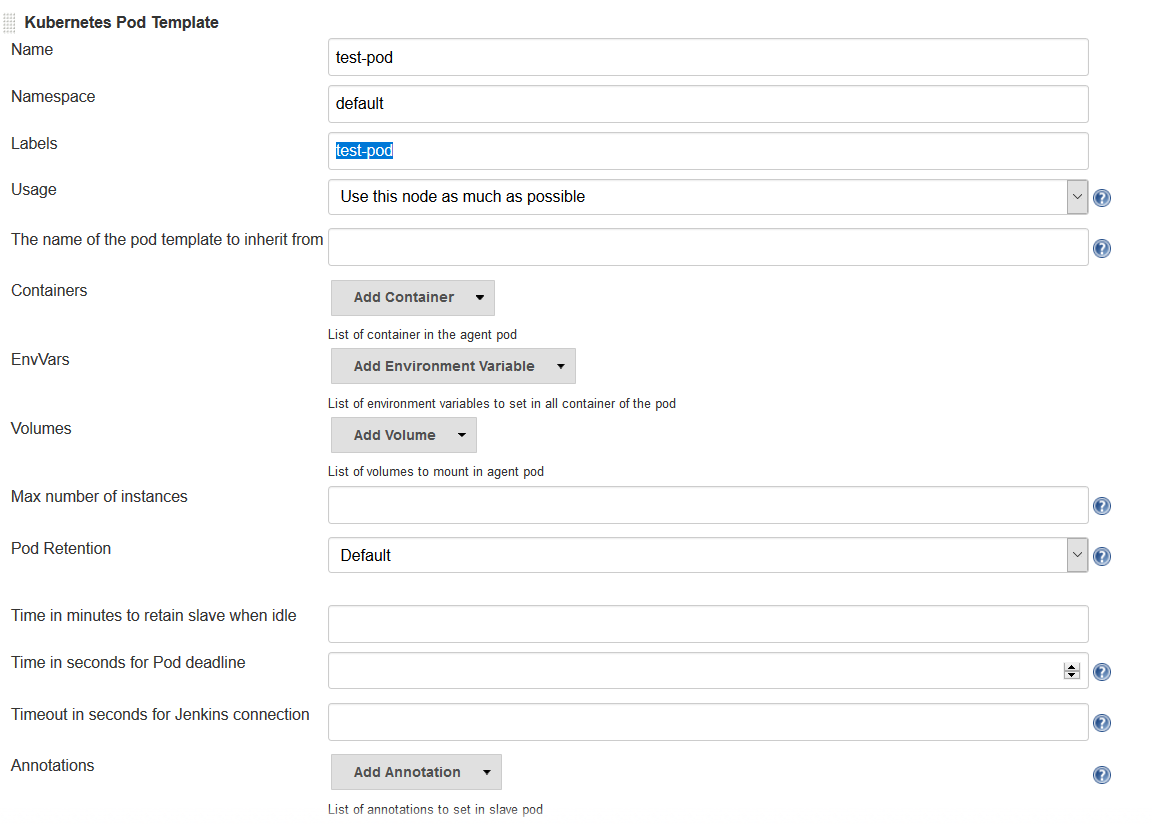
Remember that a pod consists of one or more containers that live and die together. The pod must always include a JNLP container, which is configured by default if you installed the controller using the Helm Chart. However, you will want to add containers with the tool chains required to build your application.
Add Your Own Container Template
-
In the Jenkins UI, return to the pod template you created in the last step
-
Click the Add Container button and select Container Template
-
Enter values in the following fields:
-
Name:
<your choice> -
Docker image: any Docker image you’d like For example, if you are building an application written in Go, you can enter
'golang:1.11-alpine3.8' -
Label: Enter any label strings you’d like to use to refer to this container template in your pipeline scripts
-
Always pull image: - Select this option if you want the plugin to pull the image each time a pod is created.
-
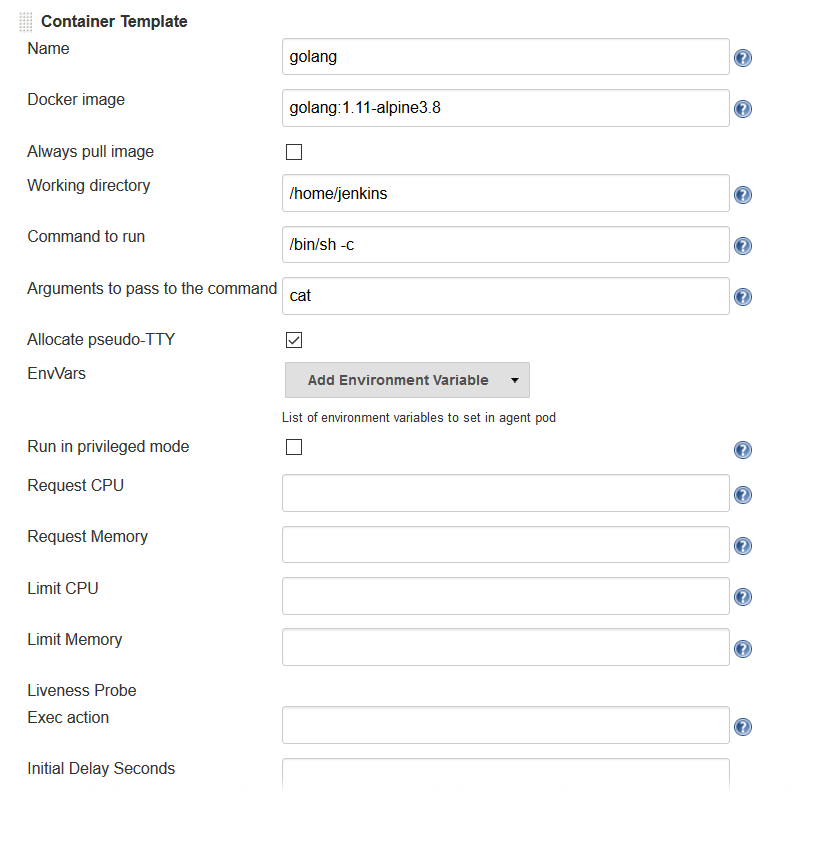
You can leave the default values for the other parameters, but you can see that the plugin gives you fine-grained control over your pod and the individual containers that run within it. Any values you might set in your Kubernetes pod configuration can be set via this plugin as well. You can also inject your configuration data by entering raw YAML. I encourage you not to get distracted by the sheer number of options you can configure in this plugin. You only have to configure a small subset of them to get a working environment.
You can click the Add Environment Variable button in the container template to inject environment variables into a specific container. You can click the Add Environment Variable button in the pod template to inject environment variables into all containers in the pod. The following environment variables are automatically injected into the default JNLP container to allow it to connect automatically to the Jenkins controller:
-
JENKINS_URL: Jenkins web interface url -
JENKINS_JNLP_URL: url for the jnlp definition of the specific agent -
JENKINS_SECRET: the secret key for authentication -
JENKINS_NAME: the name of the Jenkins agent
If you click the Add Volume button in the pod template, you’ll see several options for adding volumes to your pod. I use the Host Path Volume option to mount the docker socket inside the pod. I can then run a container with the Docker client installed and use the host Docker socket to build and push Docker images.
At this point, we’ve created a cloud configuration for our Kubernetes cluster and defined a pod consisting of one or more containers. Now, how do we use this to run Jenkins jobs? We simply refer to the pod and containers by label in our Jenkins pipeline script. We use the label we gave to the pod in the node block and the label for the container we wish to use in the container block. The examples in this post use scripted pipeline, but you can achieve the same outcome using the declarative pipeline syntax:
node('test-pod') {
    stage('Checkout') {
        checkout scm
    }
    stage('Build'){
        container('go-agent') {
            // This is where we build our code.
        }
    }
}
Defining the Pod in the Jenkinsfile
Configuring a plugin through the UI is perfectly fine in a proof of concept. However, it does not result in a software-defined infrastructure that can be versioned and stored right alongside your source code. Luckily, you can create the entire pod definition directly in your Jenkinsfile. Is there anything you can’t do in a Jenkinsfile???
Any of the configuration parameters available in the UI or in the YAML definition can be added to the podTemplate and containerTemplate sections.
In the example below, I’ve defined a pod with two container templates.
The pod label is used in the node block to signify that we want to spin up an instance of this pod.
Any steps defined directly inside the node block but not in a container block with be run in the default JNLP container.
The container block is used to signify that the steps inside the block should be run inside the container with the given label.
I’ve defined a container template with the label 'golang', which I will use to build the Go executable that I will eventually package into a Docker image.
In the volumes definition, I have indicated that I want to mount the Docker socket of the host, but I still need the Docker client to interact with it using the Docker API.
Therefore, I’ve defined a container template with the label 'docker' which uses an image with the Docker client installed.
podTemplate(
    name: 'test-pod',
    label: 'test-pod',
    containers: [
        containerTemplate(name: 'golang', image: 'golang:1.9.4-alpine3.7'),
        containerTemplate(name: 'docker', image:'trion/jenkins-docker-client'),
    ],
    volumes: [
        hostPathVolume(mountPath: '/var/run/docker.sock'),
        hostPath: '/var/run/docker.sock',
    ],
    {
        //node = the pod label
        node('test-pod'){
            //container = the container label
            stage('Build'){
                container('golang'){
                    // This is where we build our code.
                }
            }
            stage('Build Docker Image'){
                container(‘docker’){
                    // This is where we build the Docker image
                }
            }
        }
    })
In my Docker-based pipeline scripts, I was building Docker images and pushing them to a Docker registry, and it was important to me to replicate that exactly with my new Kubernetes setup.
Once I accomplished that, I was ready to build my image using gcloud, the Google Cloud SDK, and push that image to the Google Container Registry in anticipation of deploying to my K8s cluster.
To do this, I specified a container template using a gcloud image and changed my docker command to a gcloud command. It’s that simple!
podTemplate(
    name: 'test-pod',
    label: 'test-pod',
    containers: [
        containerTemplate(name: 'golang', image: 'golang:1.9.4-alpine3.7'),
        containerTemplate(name: 'gcloud', image:'gcr.io/cloud-builders/gcloud'),
    ],
    {
        //node = the pod label
        node('test-pod'){
            //container = the container label
            stage('Build'){
                container('golang'){
                    // This is where we build our code.
                }
            }
            stage('Build Docker Image'){
                container(‘gcloud’){
                    //This is where we build and push our Docker image.
                }
            }
        }
    })
Standing up a Jenkins controller on Kubernetes, running ephemeral agents, and building and deploying a sample application only took me a couple of hours. I spent another weekend really digging in to better understand the platform. You can be up and running in a matter of days if you are a quick study. There are a wealth of resources available on running Jenkins on Kubernetes, and I hope this blog post helps to further that knowledge. Even better, come to my session at Jenkins World and let’s talk in person.
So, what else do you want to know? Hit me up on Twitter. I might even add your questions to my Jenkins World session. I suppose next up is Mesos?
|
Come meet Mandy and other Jenkins and Kubernetes experts at
Jenkins World on September 16-19th,
register with the code |
About the author